Maintaining a synchronised client folder structure
- Hugh Marshall
- Aug 29, 2023
- 3 min read
Updated: Mar 26, 2024
In my previous article (Folder Magic: Automatically create structured Client folders in Zoho WorkDrive from Zoho CRM), I showed you how you can add automation within Zoho CRM, that builds out a client folder structure within Zoho WorkDrive. Building upon that foundation, today's exploration takes us further as I demonstrate how to incorporate supplementary automation to maintain a synchronised client folder structure. This expansion will revolve around the dynamic renaming and deletion of Zoho WorkDrive folders, all orchestrated in response to record actions within Zoho CRM.
How It Works
For each module where WorkDrive folder automation is implemented, we're introducing workflow automation to address specific tasks. It's important to highlight that these enhancements can be implemented independently, providing flexibility and adaptability to your needs.
Renaming
When a field that contributes to the composition of a folder's name on a record is modified within Zoho CRM, our integration seamlessly updates the corresponding folder's name within Zoho WorkDrive. This ensures that your folder structure remains synchronised and organised, reflecting real-time changes in your CRM records.
Deleting
As you interact with your CRM and records are deleted, our automation takes care of the corresponding folders in Zoho WorkDrive. No manual intervention is required – when a record is removed in CRM, the corresponding folder is automatically deleted in WorkDrive, streamlining your workflow and ensuring consistency between platforms.
This approach not only enhances your automation capabilities but also reduces manual effort and potential errors, contributing to a smoother and more efficient workflow.
Design
To optimise the automation process and streamline the workflow process, we will be adopting a repeatable approach for renaming and deleting folders within WorkDrive. Rather than duplicating functions for each workflow scenario, we've crafted two standalone functions that can be triggered seamlessly through a webhook action from the workflow.
This strategic move not only reduces the integrations complexity but also enhances efficiency by centralising the control of the renaming and deleting processes.
Functions
We will be creating 2 standalone functions for this automation and the code is provided below.
To create a function go to Settings > Developer Space > Functions
Click New Function
Enter a Function Name (No Spaces)
Enter a Display Name
Set the Category to Standalone
Click Create
Enter code below
Click Save
We need to expose these functions by API so that we can trigger them from a webhook action.
To expose a function via REST API go to Settings > Developer Space > Functions
Click the ellipsis next to the function
Select REST API
Check the OAuth2 Toggle
Copy the URL that appears
Renaming WorkDrive Folder Function Code
Arguments
newFolderName (String)
workdriveFolderId (String)
Deleting WorkDrive Folder Function Code
Arguments
workdriveFolderId (String)
Workflows
Now that the functions are setup and exposed by API we can configure our workflows and webhook actions to trigger them.
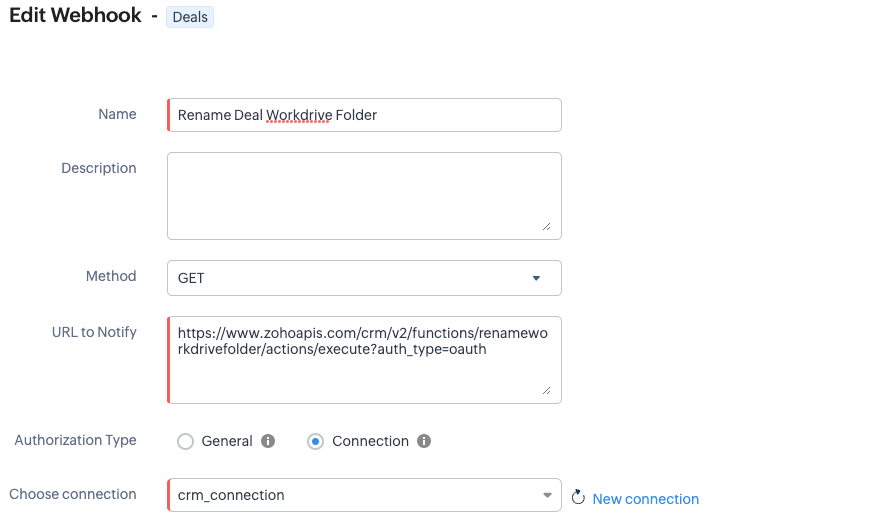
To setup a webhook action inside a workflow
Under instant actions in a workflow select Webhook
Click New Webhook
Enter the Webhook Name / Description
Set the Method to GET
The URL To Notify is the OAuth URL of the function
Set the Authorization Type to Connection and select the crm_connection
Module Parameters are the values we are passing to the function which you can set to a field in the module.
workdriveFolderId
newFolderName
If your folder name is made up of multiple fields use User defined Format instead of module parameters, and use the # key to insert merge fields.
Click Save and Associate


Renaming

Ensure that your renaming workflow is triggering whenever any of the fields used to make up the folders name are modified. In my example its only the deal name, but ensure you select the option for this workflow to repeat every time the field(s) are modified. We only need to trigger this workflow for records that have a corresponding WorkDrive Folder so ensure the condition of WorkDrive Folder ID isn't empty.
Deleting

The deleting function will need to be triggered when a record is deleted. We only need to trigger this workflow for records that have a corresponding WorkDrive Folder so ensure the condition of WorkDrive Folder ID isn't empty.
I hope this article has helped you enhance your Zoho CRM and Zoho WorkDrive Folder automation and take it to the next level. By adding this to your CRM your folder structure will remain automatically synchronised with your CRM.
Looking to take this automation to the next level, check out my follow up article on how to display the WorkDrive folder contents inside a related list on the record.
Need Help? Contact us!


Comments